Archive for the ‘DIY’ Category:

DIY Backyard Fire Pit: Build It in Just 7 Easy Steps

Turn your backyard into a cozy camp spot by making your own fire pit. This DIY project is easy to complete, and you'll be making s'mores around the fire in no time.

Get ready

Before you begin building, consult your local fire code to see if fire pits are allowed in your city and, if so, how far away the fire pit has to be from a structure.

Then, gather your supplies:

  • Bricks for the fire pit wall
  • Gravel
  • Twine or string
  • Tape measure
  • Stake
  • Large shovel
  • Trowel
  • Tamp
  • Level

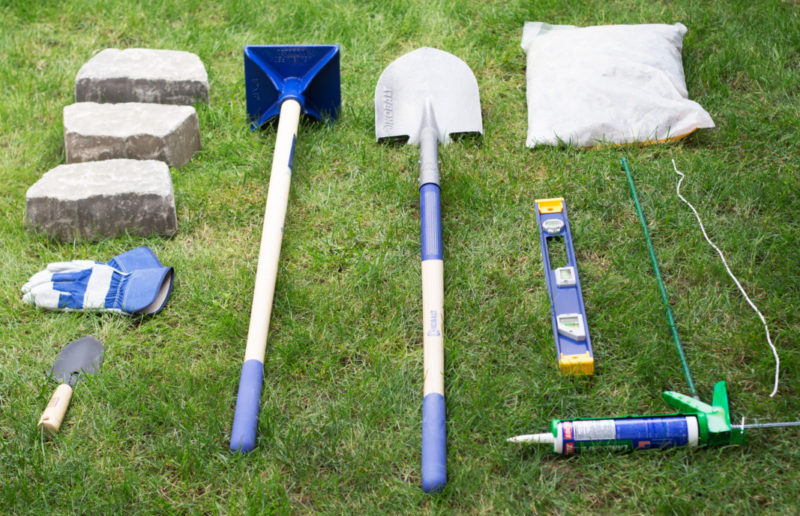
When purchasing bricks for the fire pit wall, go for something sturdy like retaining wall bricks or concrete pavers. Some home improvement stores even carry bricks specifically designed for fire pits. Use a layer of firebricks, which have a higher heat resistance, on the inner layer of the fire pit as an extra safety measure.

Now that you have all your supplies and you’ve checked your local fire code, you’re ready to build!

1. Create a circle

Pick a spot for your fire pit (ensuring that it is located a safe distance from any structures, bushes or trees) and insert a stake in the ground where the center of the pit will be.

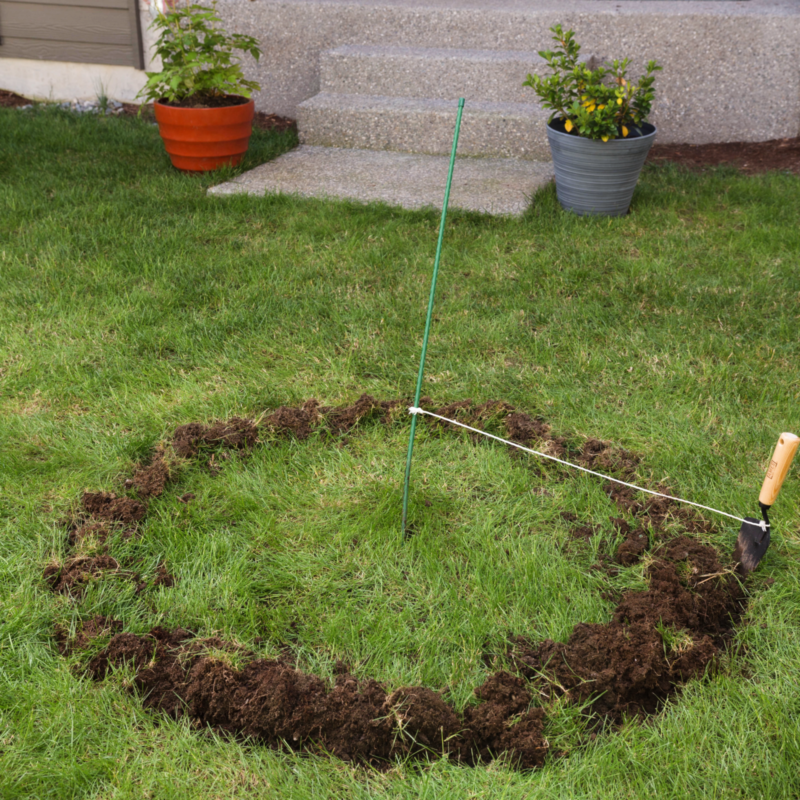
Tie one end of the string or twine to the stake and measure how wide you want your circle to be.

Typically, a fire pit has a diameter of about 4-5 feet. Cut the string and tie the other end to the handle of a trowel. With the string or twine taut, drag the sharp end of the trowel around in a circle, creating a line in the grass.

2. Shovel out the grass

Using a large shovel, dig out the grass inside the circle.

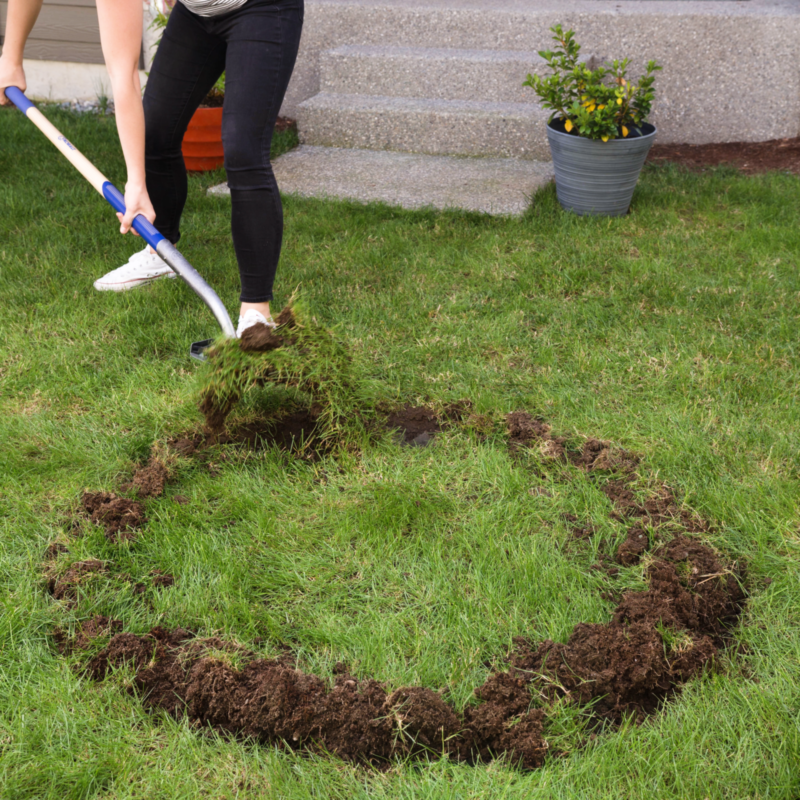
For safety purposes, the hole for a fire pit should be about 6-12 inches deep. Be sure to call 811 before you start digging to ensure there are no utility lines buried under the spot you’ve chosen.

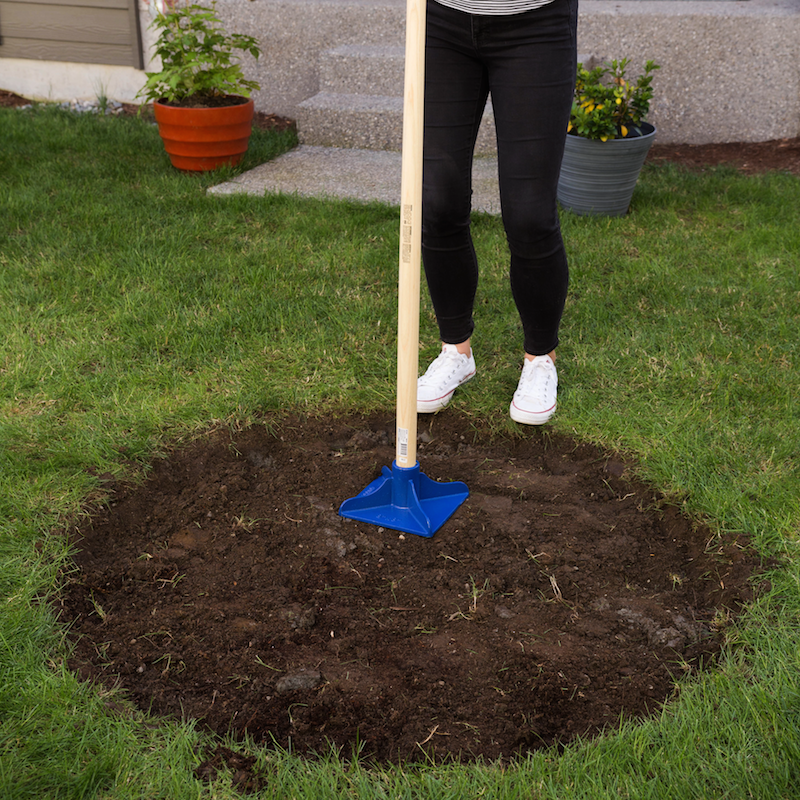
3. Tamp down the dirt

If you don't have a tamp, you can just use the bottom of your shovel.

4. Make sure the circle is level

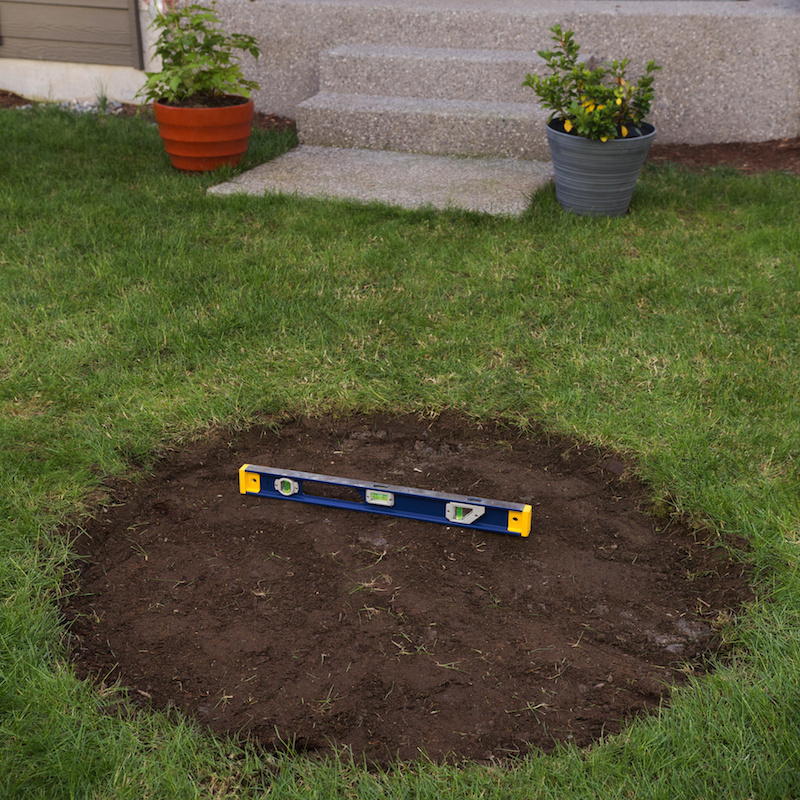
Get down on the ground with your level to ensure that the surface is ready for the bricks. Keep making small adjustments until it's completely level.
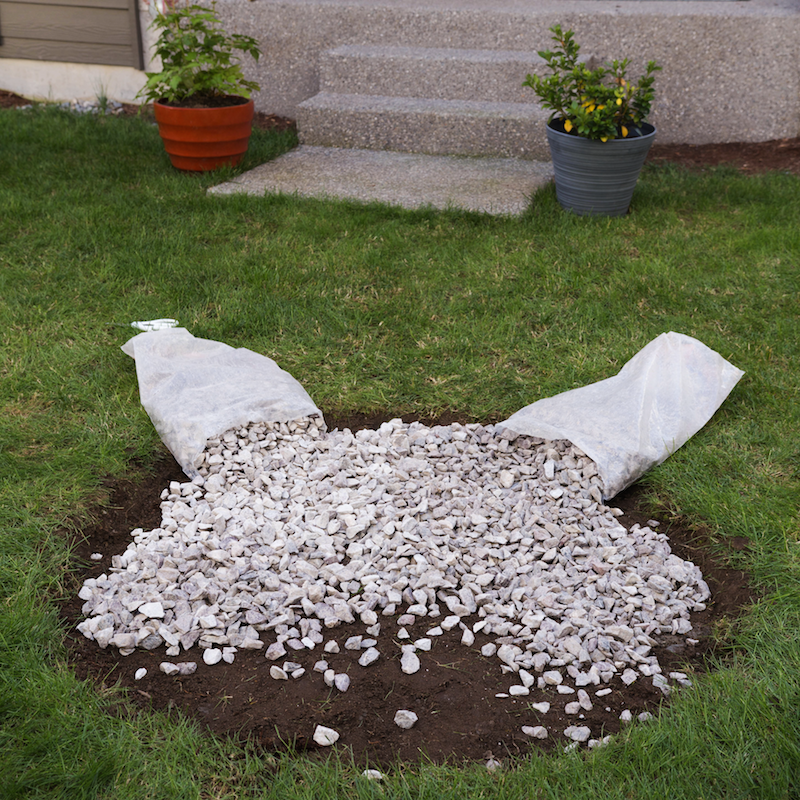
5. Add gravel

Put a pretty thick layer of gravel in the fire pit (at least a couple of inches). Spread the gravel around evenly.

6. Arrange the bricks

After you've spread the gravel around, arrange your bricks in a circle and stack them in layers until the fire pit wall is at least 12 inches tall.

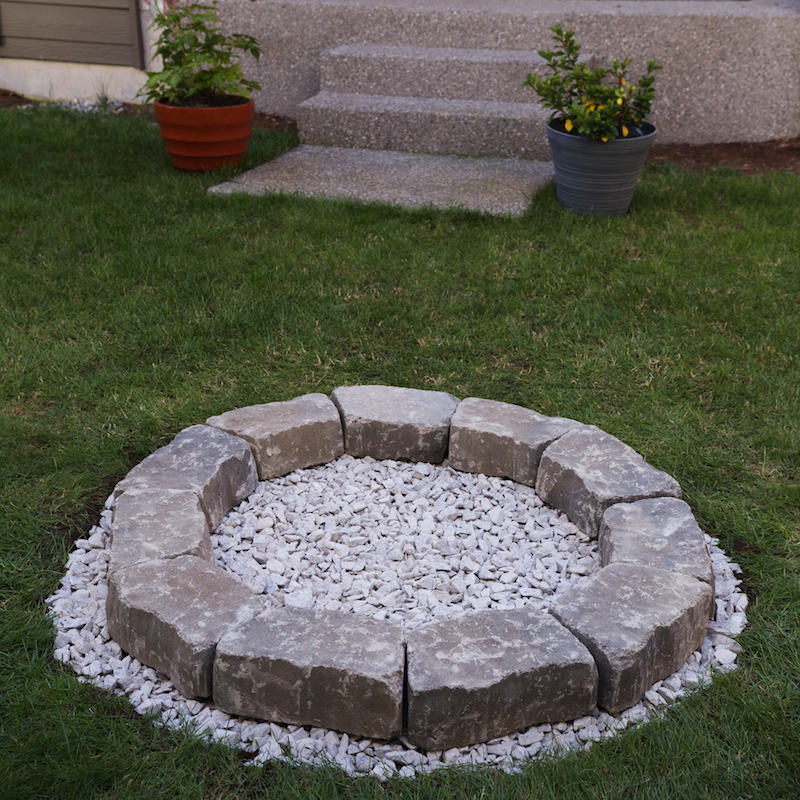
For extra safety, you have the option to put an inner layer of firebricks. Though you don't need to use mortar if the bricks are heavy enough to make a sturdy stack, you can use an outdoor fire-resistant mortar between the bricks for extra stability.
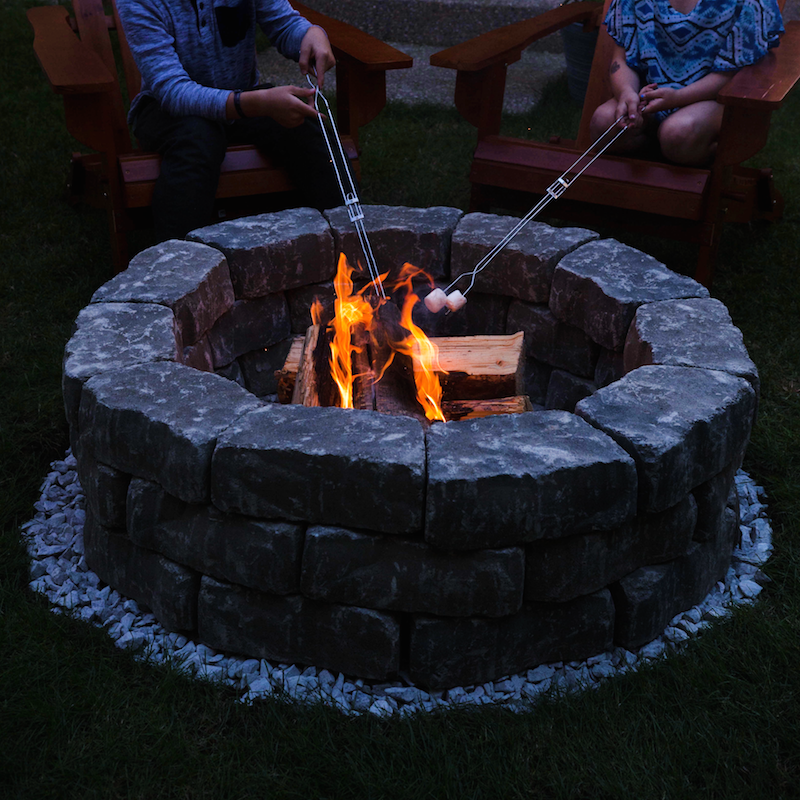
7. Relax and enjoy!

Gather a couple of Adirondack chairs, some firewood, a few friends and campfire treats to get full use out of your new fire pit.


Related:

Originally published July 19, 2017.

Good Clean Fun: How to Build an Outdoor Shower

Outdoor showers may seem like a luxury - something that only those with beach houses would need or be lucky enough to have. But an avid gardener, runner or someone that enjoys the freedom of bathing in nature, you may consider an outdoor shower for your own home.

Lucky for you, outdoor showers are an accessible feature for just about anyone. It all depends on how simple or complex you want your shower to be. A simple outdoor shower with cold water costs approximately $1,000 or less. An outdoor shower with an enclosure and hot and cold water will run about $4,000-$8,000.

Here are four things to consider before taking the plunge on your own little piece of outdoor bathing heaven.

Location

This is one of the most important considerations. It’s best to choose a spot that you use often. In most cases, anywhere near the back entrance to your home is a good choice - maybe adjacent to the back door or on the back deck. If you have a pool, situate the shower nearby for easy rinses before and after swimming.

Another major consideration is plumbing access. Unless you’re installing the type of shower that attaches to a garden hose, you’ll need to install it close to existing plumbing.

Last but not least, go for a sunny spot. This will help keep mold and mildew at bay and provide natural warmth while you rinse.

Privacy

Privacy is a fairly important consideration, unless you think only swimsuit-clad people will use the outdoor shower. You want the shower to feel private and far from prying eyes, but you also want to keep the natural feeling.

Photo from Zillow listing.

An easy and adjustable choice is a freestanding folding screen. These screens work particularly well on decks and patios, where it might be impractical to build any type of wall.

Another option is building corrugated metal wing walls to create a shower “corner” of sorts, where swimmers can rinse off after a dip. You can make this more private by adding a third wall to the design. Of course, there’s always the more elaborate option, which would be to surround the shower with wooden walls.

Plumbing

The simplest and most inexpensive plumbing option, and one that many people choose, is a shower connected to a garden hose, which is then hooked up to an outside faucet. This cold-water fixture is perfect for an outdoor shower that’s used only in the heat of summer and mostly for cleaning off dirt and sand.

Next up is the hot-and-cold hose option. First, you’ll need a plumber to install an outdoor hot-water faucet next to the cold one. From there, it basically works in a similar fashion to the cold-water hose shower.

The most elaborate - and most expensive - is the plumbed-in outdoor shower. This is worth investing in if you anticipate consistent outdoor showers and not just cleaning up after a hot day in the sun. The only downside to this option: If you live in an area with freezing winters, you have to make sure you can fully drain and insulate the plumbing so it doesn't burst.

Drainage

The simplest and most common drainage system is letting the used water drain into your yard. If you don't have very porous ground in your yard, or if the outdoor shower is close to your home, consider attaching the plumbing to your home’s drainage pipes or installing a French drain (essentially a gravel-lined channel connected to a pipe that directs water to a drainage area).

The easiest thing to do, of course, is to go with the first option and recycle the water into your garden.

Accessories

Incorporate affordable accessories that add to the fun and pleasure of showering outdoors. A large rainfall showerhead enhances that outdoor feeling, and plants or flowers in the shower area or peeping through the enclosure add a whimsical touch.

Add some soft solar-powered lights for showering at dusk, install hooks for hanging towels and wet bathing suits, and maybe even add a chair to sit in. Most importantly, design your shower to take advantage of nature’s views, whether that’s the sky overhead or the splendor of your backyard garden.

Photo from Zillow listing.

With just a little planning and effort, you can install your own outdoor shower and stay cool during the sunnier months.

Related:

Originally published June 26, 2017.

With This DIY Sporting Goods Catch-All, Game Day Is No Sweat

This project will help you organize your garage and become the MVP of DIY projects. With all your sporting gear in the same place, you’ll always be prepared when someone yells, "Where’s my basketball?” (Or volleyball, hockey stick, tennis racket, etc.)

See how it’s done, then follow the step-by-step instructions to build one of your own.

1. Find a bookcase

Choose a bookcase with at least three wide shelves so you can store gear in a variety of sizes.

2. Add locking wheels

Attach locking wheels to the bottom of the bookcase so you can easily move it around the mudroom or the garage.

3. Drill holes

Drill evenly spaced holes (about four or five, depending on the width of the bookcase) along the top surface of one of the shelves. Keep the holes fairly close to the edge - about one-half inch away or less.

On the underside of the shelf below, drill holes to match up exactly with the holes on the shelf above.

4. Attach bungee cords

Place the bungee cord hooks in the drilled holes, and arrange the cords vertically so they create a net. You want the cords to be pretty taut, so get the right size for your bookcase.

5. Mount peg boards

Frame the sides of your bookcase with 1-by-2-inch boards to support peg boards that have been cut to size. Secure the peg boards with a few nails on the top and bottom.

6. Customize with hooks and holders

Place hooks and holders on the peg board so you can hang your tennis rackets, baseball gloves, jerseys, helmets and more.

7. Load up your catch-all, MVP!

Grab your gear and organize the bins however you see fit. Now all you have to worry about is scoring the winning goal.

Related:

Originally published September 2017.
Realtor MLS Logo
© 2020 Russell Rich Real Estate | All Rights Reserved